This post comes from a research I did as an undergraduate and member of Ganesh-ICMC. I believe much of the stuff I did there could be useful to more people, so I’d like to share this knowledge through publications in this blog.
Side-channel attacks try to leak data observing effects from an algorithm implementation, like time taken and power consumption. If these effects are affected from the algorithm’s input, measuring them makes it possible to infer information about this input. That said, to analyze these attacks it is necessary to think both about the software and the hardware.
In cryptography, there is much concern with side-channels because the secrecy of the keys used in the algorithms is what makes the communication secure and they shouldn’t be leaked. Because of this, there are big conferences and journals about designing secure cryptographic devices, like the Conference on Cryptographic Hardware and Embedded Systems (CHES) and the Journal of Cryptographic Engineering, and many PhD thesis about side channel are published every year [5].
Sound-based attack
In the 2020’s SpamAndHex CTF challenge, one of the challenges had a broken video file of a 3D printer that wrote the flag’s text, the secret we sought. The video shows the printer writing the text “SAF”, but after that the video freezes and only the printer noise can be heard.
However, this noise indicates what kind of movement the printer was doing, and that was enough information to obtain the text the printer was writing, SAF{AIRGAPPED2}. Our writeup for this challenge shows the whole procedure.
Even though this challenge is only a CTF challenge, the acoustic attack has practical applications. The first registered side-channel in history was in 1965 and consisted of using a microphone to determine the position of some of the rotors in a cryptographic machine [2][5]. Using the noise, the British Intelligence was able to infer the machine’s configuration and to sniff the enciphered communication between Egypt embassies.
A more modern example was in harwear.io 2022, where researchers have shown in their presentation how they broke a conventional laptop’s ECDSA cryptography using a microphone.
Time-based attack
An example of a vulnerable algorithm for a time side-channel attack is the character-by-character password check.
In this case, partially right passwords take more time than completely wrong passwords. For example, if the right password is 123456 and the guess is ABCDEF, the algorithm can end after the first comparison, of 1 and A. However, if the guess is 12345A, the algorithm has to go through 6 characters to determine that the password in incorrect, when it compares 6 and A.
The following Python code shows an implementation of this technique:
def unsafe_pass_check(password, user_input):
    if len(password) != len(user_input):
        return False

    for i,c in enumerate(user_input):
        if c != password[i]:
            return False
    return True
To validate in practice if this time difference is perceptible, we have the following code that tries various password lengths and measures the time of the length check at the start of the function:
from time import time
import matplotlib.pyplot as plt
from statistics import mean, stdev

NUM_TRIES=100
MAX_TIME = 1e-6 # threshold to eliminate outliers

times_mean  = []
times_stdev = []
sizes = []

for l in range(20):
    tries = []
    for n_try in range(NUM_TRIES):
        guess = l*b"A"
        start = time()
        unsafe_pass_check(PASS, guess)
        end = time()
        duration = end-start
        if duration < MAX_TIME:
            tries.append(end-start)
    times_mean.append( mean(tries) )
    times_stdev.append( stdev(tries) )
    sizes.append(l)

plt.errorbar(sizes, times_mean, yerr=times_stdev, linestyle="None", marker="o", capsize=5.0)
plt.ylim(0, 2e-6)
plt.show()
Then we can see the following time measurement for the different password lengths:
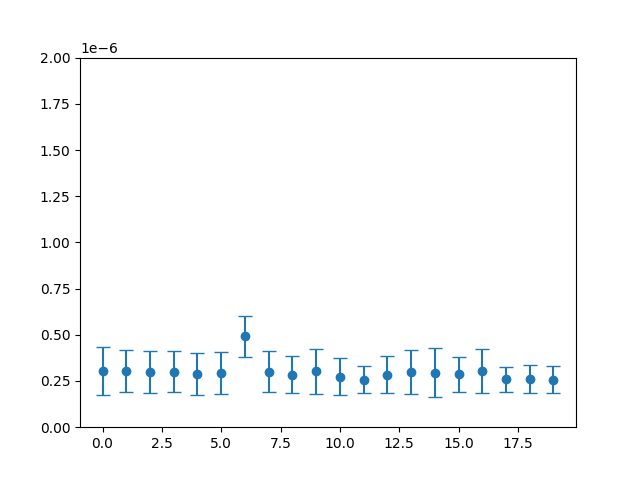
In this picture we can see that the password with length 6 takes more time and this behavior leaks that 6 is the correct size. This time difference appears because, once the function verifies the size is right, it continues to run and check the first character, but otherwise it ends immediately.
With this legth in hand, we can guess different starting characters for the password and measure the time they take, The following script does this:
from time import time
import matplotlib.pyplot as plt
from statistics import mean, stdev
from string import ascii_letters, digits

char_list = ascii_letters+digits
LEN = 6
MAX_TIME = 1e-6 # threshold to eliminate outliers

times_mean  = []
times_stdev = []
chars = []

NUM_TRIES=2000
for c in char_list:
    tries = []
    for n_try in range(NUM_TRIES):
        guess = c.encode() + (LEN-1)*b"A"
        start = time()
        unsafe_pass_check(PASS, guess)
        end = time()
        duration = end-start
        if duration < MAX_TIME:
            tries.append(duration)
    times_mean.append( mean(tries) )
    times_stdev.append( stdev(tries) )
    chars.append(c)

plt.errorbar(chars, times_mean, yerr=times_stdev, linestyle="None", marker="o", capsize=5.0)
plt.ylim(0, 2e-6)
plt.show()
Then we have the following time measurements for password beginning by each alphanumeric character:
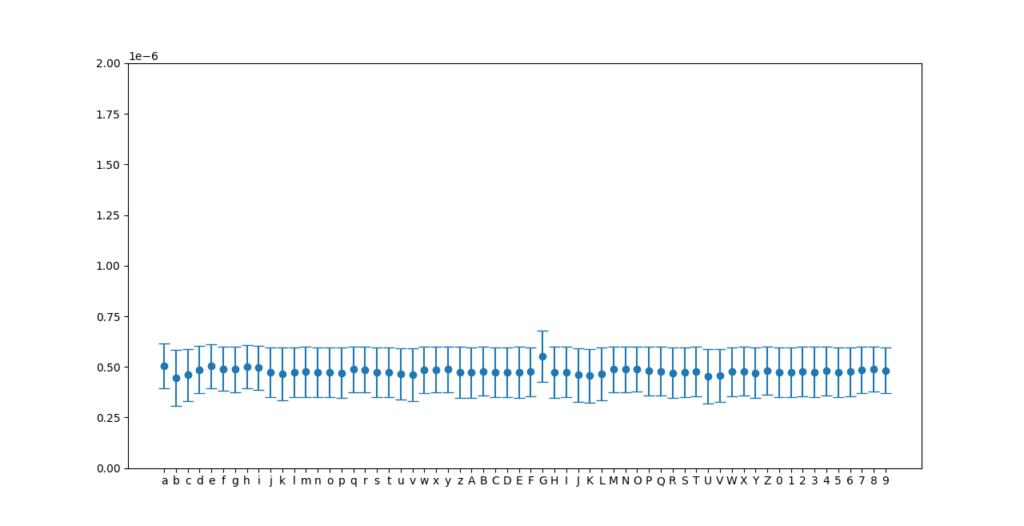
Here we can see that the “G” character takes a little more time than the others, and this difference exists because when the first character is right, the second character is also checked, but the function returns immediately otherwise.
With the first characters in hands, we can do the same procedure to determine the second character, then the third, and so on. The following script leaks the whole password:
from time import time
from statistics import mean
from string import ascii_letters, digits
char_list = ascii_letters+digits

LEN = 6
MAX_TIME = 2e-6 # threshold to eliminate outliers
discovered = b""

NUM_TRIES=2000
for i in range(LEN-1):
    times_mean  = []
    chars = []
    for c in char_list:
        tries = []
        for n_try in range(NUM_TRIES):
            guess = discovered + c.encode() + (LEN-len(discovered)-1)*b"A"
            start = time()
            unsafe_pass_check(PASS, guess)
            end = time()
            duration = end-start
            if duration < MAX_TIME:
                tries.append(end-start)
        times_mean.append( mean(tries) )
        chars.append(c)
    max_time_idx = max((v,i) for i,v in enumerate(times_mean))[1]
    print(char_list[max_time_idx])
    discovered += char_list[max_time_idx].encode()

for c in char_list:
    if unsafe_pass_check(PASS, discovered + c.encode()):
        discovered += c.encode()
        print(c, end="")
        break

print("\n{isCorrect} {passwd}".format(isCorrect=(LEN==len(discovered)), passwd=discovered.decode()) )
This last code gets the password: G4nesh. We leaked a secret value!
From this example, we can see that differences in running times, even if small, can be enough to leak important information. I don’t know about any real world attack using this technique, but it was used in this solution for the “Ethernet from Above” in the Pwn2Win 2021 CTF.
To defend oneself from these timing attacks, cryptographic algorithms attempt to take constant time, even if this means to take more time than it’s necessary. Another strategy to minimize the problem is to add random delays in the processing.
In the case of our function, we can protect it by removing the conditional branch using a character-by-character XOR, followed by an OR with an accumulator. Then, if any bit is different, the XOR gives an non-zero value and this bit is preserved in the accumulator. This solution is as follows:
def safe_pass_check(password, user_input):
    if len(password) != len(user_input):
        return False

    accumulator = 0x00
    for i,c in enumerate(user_input):
        accumulator = accumulator | (c ^ password[i])

    if accumulator:
        return False
    return True
Power-based attack – Electronics principles
To understand why power attacks exist, it is important to visualize how the power consumption works in a typical logic circuit.
Every digital circuit, like the components of a CPU, is built from logic gates, like NAND, NOR and NOT. In the chip’s development process, these logic gates ate mapped to electronic circuits according to a logic family, usually CMOS.
For example, in the image bellow, there is the electronic corresponding to a inverter logic gate:

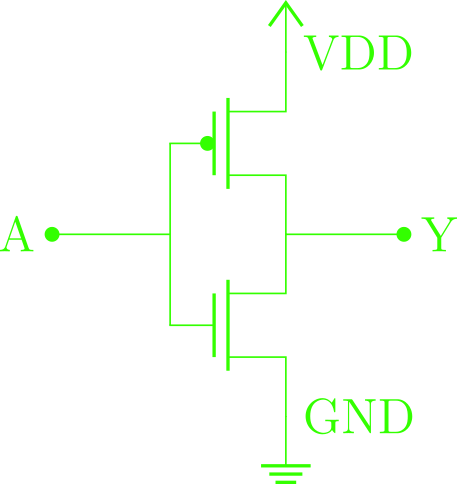
Logic representation of an inverter and it’s CMOS construction
The CMOS inverter consists in an PMOS transistor connected to the VDD source voltage and a NMOS transistor connected to the GND ground.
Approximating transistors as controlled switches, when the voltage in A is 0V the PMOS is conducting and the NMOS is cut, so the Y output is connected to the VDD source. Analogously, if the voltage in A is VDD, the PMOS is cut and the NMOS is conducting, connecting the output to GND. With this, we have the behavior of an inverter, that gives low logic level for a high logic level and vice-versa.
In the case above, the inverter output is disconnected and the transistor don’t feed any load. However, in practice logic gates almost always have other logic gates as inputs and outputs, like the middle inverter in the following figure:
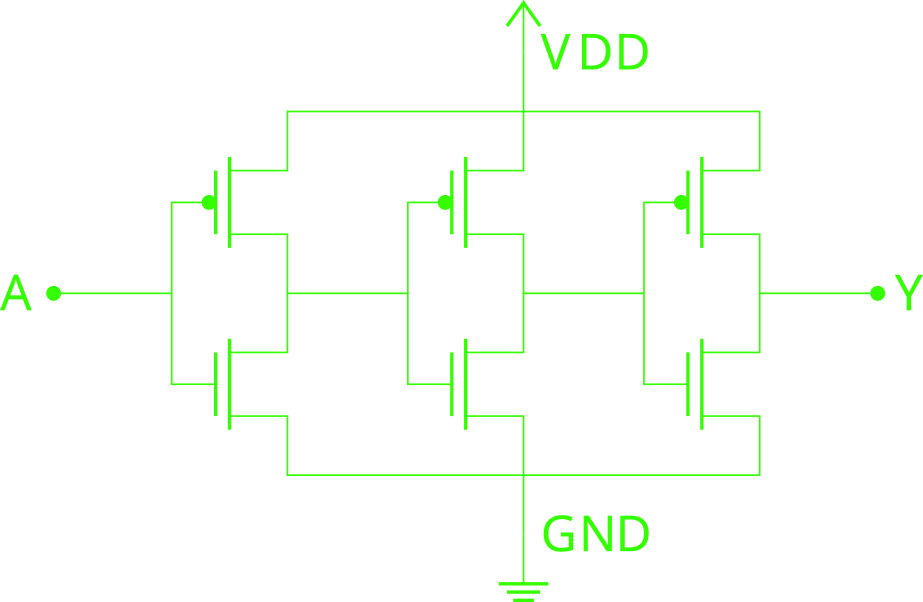
The input of logic gates are gates of MOSFET transistors, which have capacitive behavior. More precisely, this load behaves as a MOS capacitor. It’s structure is as the following figure shows:

Then the load of a logic gate can be modeled as a capacitor. According to the capacitor’s equation, $i = C \frac{du}{dt}$, a capacitor conducts electric current only when the voltage varies, that is, the transistors only consume energy during state transitions. A CMOS logic gate takes zero power if it’s output is constant!
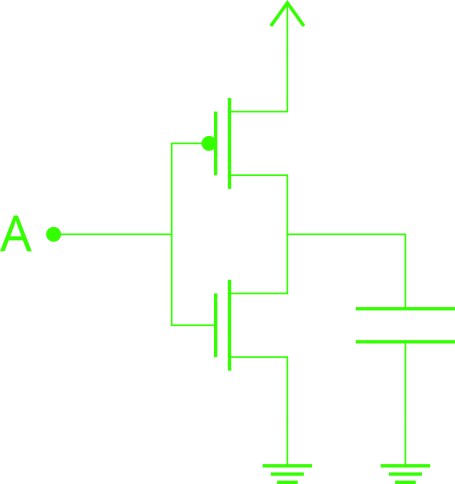
In this sense, an output transition from 0 to 1 begins with a capacitor in 0V and it charges itself with the current from the PMOS transistor until it has VDD voltage, then there is no current drawn. On the other hand, in the 1 to 0 transition, the capacitor at the output starts charged to VDD and discharges itself through the NMOS transistor.
The following code for NGSPICE simulates the circuit from the figure with 3 inverters, receiving a square wave as input. It makes measurements of the currents that pass trough the transistors in the central inverter and the logic gate’s input and output voltages.
CMOS Inverter

* Loads transistor models
.model N1 NMOS level=8 version=3.3.0
.model P1 PMOS level=8 version=3.3.0

* Inverter definition
.subckt INV in out vdd vss
M1 out in vdd vdd P1
M2 out in vss vss N1
.ends INV

* Power source and input
VDD vdd 0 5V
VIN in  0 PULSE 0V 5V 400ns 100ns 100ns 400ns 1u

* Inverters
X1    in mid12  vdd    0 INV
X2 mid12 mid23 xpow xgnd INV
X3 mid23   out  vdd    0 INV

* Current measurement
Vpow vdd   xpow 0V
Vgnd xgnd     0 0V

* Simulation
.tran 10ns 2.25u
.end

* Console
* run
* plot v(mid12)/1e5+300u v(mid23)/1e5+200u i(vpow)+100u i(vgnd)
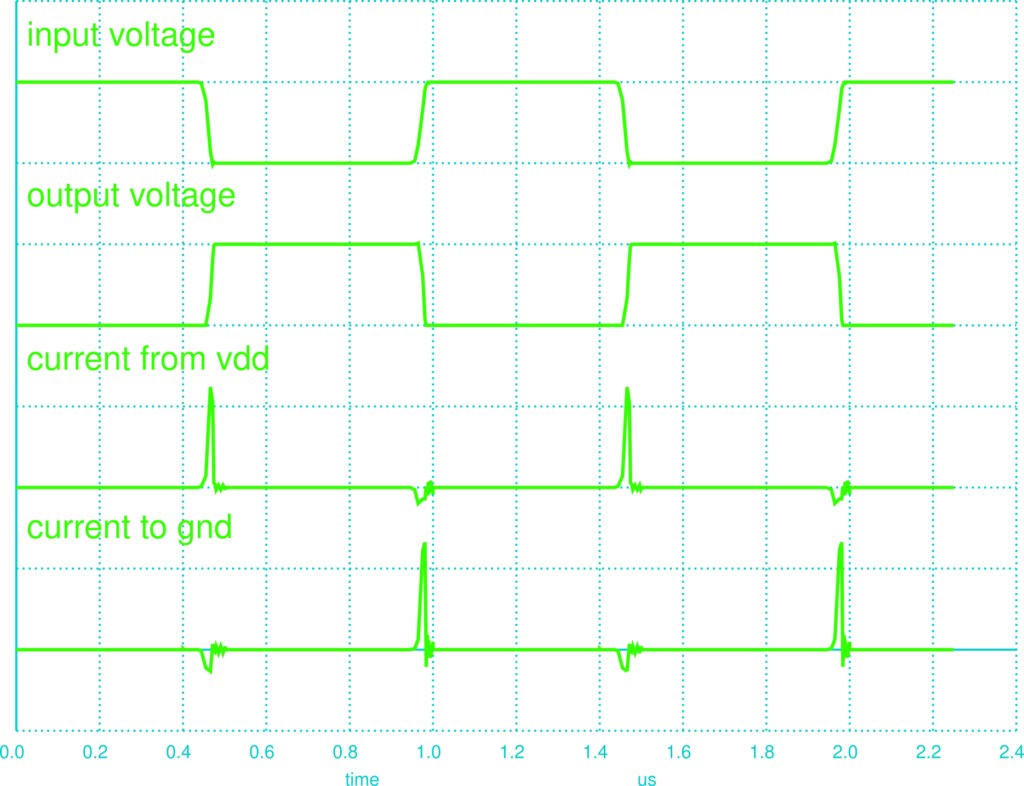
In the figure, we can observe that there is only current when there is a state transition. This current is directly linked to power consumption because $P = u \cdot i$. When the outputs becomes high, the PMOS transistor charges the capacitor with current coming from the VDD source, and when it becomes low, the NMOS transistor discharges the capacitor to GND.
Electromagnetic Radiation Attack
In the previous section we saw that electronic circuits have variations in their power consumption when running an algorithm, which can leak data, but they also emanate electromagnetic radiation because of currents inside the chip and this radiation can also leak data.
Using Near-field probes, as the ones in the figure, we can measure the power of the electromagnetic radiation. The behavior of this radiation is similar to the consumption of power of a chip discussed above, and the attacks are analogous.

The difference between the attacks is that a near-field probe allows to spatially select the attacked region and, with that, minimize noise from other chip regions [1]. For example, a CPU with multiple cores has the power consumption of other cores appearing as noise, so a traditional power attack becomes harder.
An interesting case of electromagnetic radiation attack is Van Eck phreaking, which is based in the radiation of harmonics present in digital signals passing though cables. The software TempestSDR brings an implementation of the attack that intercepts the signal of a monitor cable and shows the content of the screen. This video shows a demo of the attack:
This attack involving cables are is also called TEMPEST and was important to intelligence because it is useful, for example, to spy telegraph communications [4]. It’s discovery made the use electrostatic shielding in cables that send sensitive information an important theme.
Discussion
With the presented attacks, one can see that the execution of algorithms can present many side effects that can leak data. Because of these attacks, it is important to cryptography that the software and the hardware are protected and minimize these effects.
These attacks may need physical access to connect an oscilloscope to measure power consumption or an antenna, but sometimes they can be exploited purely by software. The Spectre and Meltdown vulnerabilities, discussed in a previous post, were examples of a hardware characteristic that is exploitable by software and affects modern processors.
Another curious vulnerability in modern processors was Hertzbleed. It exploits the dynamic frequency and voltage scaling of the processor to make a power side-channel create a difference in execution time. The vulnerability made an attack that was able to remotely leak the key of the SIKE cryptographic algorithm in libraries from Cloudflare and Microsoft.
Finally, these side effects that may look like unimportant details about an algorithm or hardware have real effects at security and affect even modern processors. In this sense, both the software and the hardware should be analyzed with care on systems in which side-channels are a threat.
References
[1] O’Flynn, C.; van Woudenberg, J. The Hardware Hacking Handbook: Breaking Embedded Security with Hardware Attacks; No Starch Press, 2021.
[2] F. Standaert, Introduction to Side-Channel Attacks, in: Secure Integrated Circuits and Systems, Springer, Boston, MA, 2010, pp. 27–42.
[3] Marinov, M. Remote Video Eavesdropping Using a Software-Defined Radio Platform. MS thesis, University of Cambridge 2014.
[4] N.S.A., TEMPEST: A Signal Problem
[5] Mayes, K.; Markantonakis, K. Smart Cards, Tokens, Security and Applications; Springer International Publishing, 2017.